How to Create Weapon Skins, Publish Them, and Get Accepted
Back in 2024, on average, around $400,000 were awarded to a player whose skin was accepted to CS2 by Valve.
However, in 2026, things changed, and now creators get a fixed payment of $35,000. Not a bad reward if we count that the skin artist also gets fame from the fact that his skin gets chosen.
If you think creating a CS2 weapon skin is a hard thing to do, I have good news for you: it’s easier than you think.
In this guide, we will go over the basics needed to create a weapon skin and the process of uploading your CS2 skin.
How to Make Weapon Skins?
Before you get to creating your own CS2 skin, you will need to download and install some software.
Softwares Needed:
- Blender - A free 3D creation software that you can get on Steam.
- Weapon Models - All CS2 gun models
- VTFEdit - A free graphical utility for editing VTF and VMF files
- Counter-Strike 2 Workshop Tools - the Workshop Tool that allows you to publish your creation.
Now, as you downloaded everything, you can start creating CS2 weapon skins.
Blender Software and Weapon Models Use
The process of creating a skin is not a hard thing to do, but it is structured and requires different tools. The first tool in use will be Blender:
- Open Blender, then click on “New General File”, and delete all the existing elements.
- Find the “File” section in the top left corner, and navigate to “Import” then to “Wavefront (.obj)”.
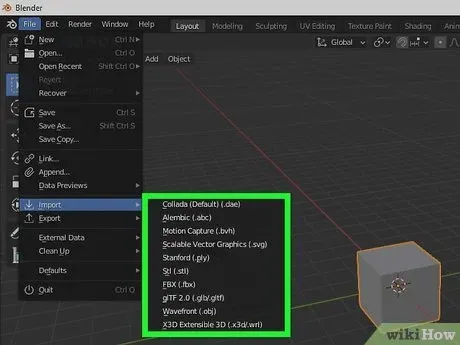
- Then you will need to open the weapon model you want to make the skin for from the Weapon Models file you downloaded.
- After the gun model is uploaded, open the “Material” section, which is the last icon on the right corner. After, create a new material for the gun and name it.
- In the top left corner, open the “Image Editor” and create a new image. Give it a name and set its size to 2048x2048.
- Head to the “Shader Editor”, check that you are on the right material that you created and named.
- In “Shader Editor”, place a new “Image Texture” and connect the “Color” to the “Base Color” of the skin. On the “Image Texture”, you will see a small picture icon, after clicking on which you select the texture.
After doing these actions, navigate back to the “3D View” again, and now it is time to color your weapon skin.
- Go to the “Texture Painting” tab, and a new window will open on the left side. Now, whatever you paint on that window texture, everything will be reflected on the weapon 3D model.
You will notice that now, as you draw something, it randomly places on the weapon 3D model. To fix that, follow the instructions:
- Open the “Edit Mode”, click “A” to select everything, and go back to the “Texture Paint”.
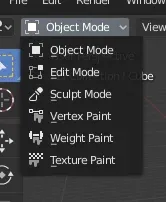
Now you can see that all of the weapon parts are shown on the left window texture. If you paint on the 3D model of the gun, the part you painted will also be shown in the texture.
It’s time for your imagination to blast. Create a design that you like, decorate it, and once you are done, you can check it in-game.
After you are done with painting your gun model, you will need to save it by going to “Image” and clicking on “Save As”. Place it in a file that you won’t forget about, and that is easy to find.
VTFEdit Software Use
After you saved all you made in the Blender app, open the VTFEdit Software you downloaded from the link. Import the texture that you created in Blender, ignore the settings, let them stay in default, and wait till the texture loads. Now navigate to “File” then “Export” and save it as a .TGA file.
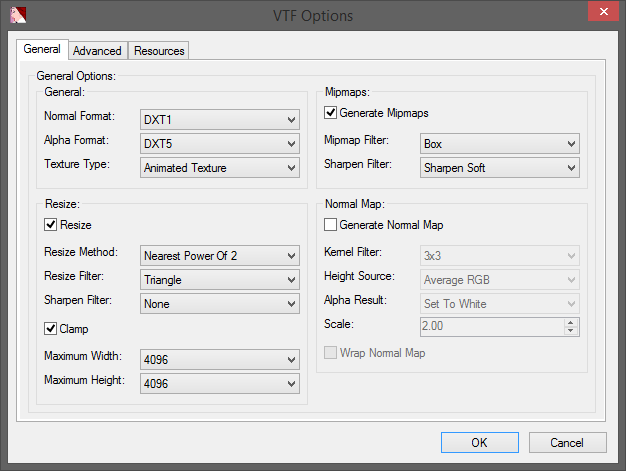
After you are done with saving it, you have to enable the “Counter-Strike 2 Workshop Tools” right from the in-game settings.
CS2 Workshop Tools Use
To view the skin you made in actual CS2, you will need to enable the workshop tools:
- Open Steam, navigate to Counter-Strike 2, and launch it.
- Go to the CS2 “Settings”, click on it, then tap on the “Game” tab.
- Find “Install Counter-Strike Workshop Tools” and make it from “No” to “Yes”.
Now, when you relaunch CS2, you will be offered two different “Launch Options”:
- Play Counter-Strike 2
- Counter-Strike 2 Workshop Tools
Click on the second option and tap on the “Play” button. Then click on “Launch Workshop Item Tools”, and a window like this will open:
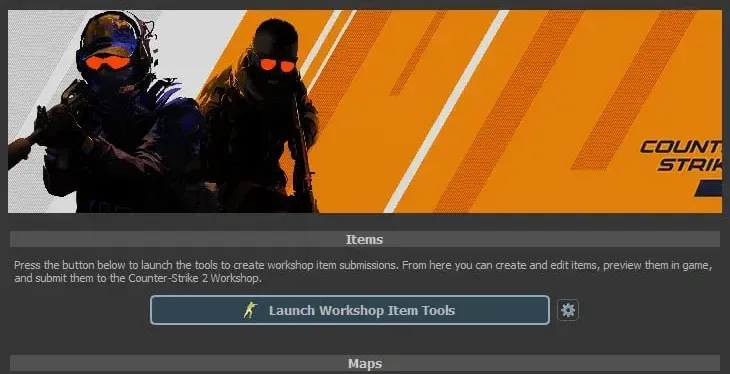
On the left side, you can see different tab options. Find the “gs_paintkit_example” and click on it. On the right side of the window, next to the “Albedo Texture”, find the folder icon and open it. Then navigate to content, CSGO, then materials, and make a new folder called “custom”.
Remember the .TGA file you created in the VTFEdit program? It's time for its use. Place it in the “custom” folder that you just created.
Then go back to the Workshop Tools window, find the “Weapon” option in the “Inspect | Preview” tab in the middle, and on the right part select the weapon that you just created the skin for.
Now, find the “Albedo Texture” and on the right part type:
materials/custom/(name of your skin).tga
All done, now you can inspect or preview the skin you made in the actual game. On the top right, you will see both the “Inspect” and the “Preview” buttons. After clicking one, you will be able to view your skin.
How to Publish Weapon Skins?
To publish the weapon skin you created, you should:
- Open the “Counter-Strike Workshop Tools” where you uploaded the skin texture.
- Find the “Publish” button in the top right corner and click it.
- A new window will open where you need to hit the “+”, and another window will appear.
- In the “Title”, give the skin name, and in “Description” write about the skin (skin history or something interesting).
- If you want to add an image, click on the “Capture” tab.
- You will also need to set the “Visibility” to “Public” to make it visible on the workshop.
To check if the posted weapon skin is visible in the workshop or not, navigate to Steam, then to Workshop, and click “Your Files”. There, you will be able to see all the weapon skins/stickers you created.
If your creation follows the requirements and doesn’t violate any rules, it will be posted to the public after approval by Steam Moderation Staff.
Moreover, you will be asked for your bank credit card information, so that if your weapon skin gets chosen by Valve, they can send you $35,000.